CIABATTA BREAD RECIPE
| HOME | > | BREAD & PIZZA |
Prep: 30 min - Cook: 4 hours - Total: 4 hour 30 min (plus 24 hours for biga)
Preparation - Challenging
Yield: Makes 2 medium-sized loaves.
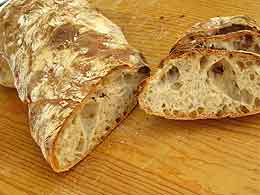
This is perfect dough for those who like their crusts crisp and their bread chewy and full of flavor. Makes killer pizza, arabic bread, pita, ciabatta and focaccia.
BIGA (the morning of the day before baking):- 1/4 tsp active dry yeast
- 1 cup warm water (110 to 115 degrees)
- 1 1/3 cups (200 grams) unbleached bread flour
- 2/3 cup (100 grams) unbleached all-purpose flour
- 2 TBS (15 grams) whole-wheat flour, preferably coarsely ground
- 2 TBS (15 grams) whole-grain rye flour, preferably coarsely ground
- 3/4 cup (185 grams) water (see method for temperature)
- SPRINKLE the yeast into warm water, stir and let stand for 5 to 10 minutes.
- MIX the bread flour, all-purpose flour, whole-wheat flour and rye flour in a bowl. Stir yeasted water again, then measure one-half teaspoon into the flour mixture. (Throw the rest away; the point of this step is not to proof the yeast but to measure 1/384 teaspoon yeast.)
- ADD the three-fourths cup water, using ice water in the summer and warm water in the winter. Thoroughly mix the biga; it will be stiff, but it has a very long fermentation and will soften considerably. Knead in a tablespoon or two of water if you absolutely must.
- COVER tightly with plastic wrap and let the biga ferment for 24 hours in a cool spot in the summer or a warm one in the winter. Don't be alarmed if it does nothing for at least 10 hours; this is correct. The biga is ready when it doubles or triples in volume and smells aromatic.
- 2 cups plus 3 tablespoons (325 grams) unbleached all-purpose flour, plus additional 1/3 cup for flouring dough, board and towels. Note: weight (325 grams) is the best way to go with flour and water in baking if you want precise level of hydration. More water means larger crumb, but more difficult to work with.
- 1 tsp (3 grams) instant yeast
- 2 3/4 tsp (13 grams) salt
- 1 1/2 cups (342 grams) lukewarm water (about 90 degrees)
- Fermented biga
- COMBINE the flour, yeast and salt in the bowl of an electric mixer or bread machine.
- STIR in the water and biga by hand to form a rough dough.
- USING a paddle attachment, beat the dough on medium speed until it is fairly smooth, about 5 minutes. If the dough is very firm, add water. This should be a very soft dough (the large hole structure typical of ciabatta comes from working with very soft, highly hydrated dough - good eplanation of 'wetness' and 'crumb' here). If your dough is not really gloppy, add extra water until the dough is soft enough to spread (your flour might be old or absorbing more water for a variety of reasons).
- SCRAPE the dough into a bowl at least three times its size and cover it tightly with plastic wrap. Let it ferment until light and doubled in bulk, about 2 1/2 to 3 hours, turning the dough every 20 minutes for a total of four times. To turn the dough, sprinkle the top of the dough (while still in the bowl) and the work surface with flour; scrape the dough out of the bowl and onto the floured work surface. Sprinkle the dough with flour again, then gently spread the dough out, trying not to deflate the bubbles. Fold it up into a tight bundle by folding the left side into the center, followed by the top, the right side and the bottom. Turn the dough over so that the smooth side is up, and fold it in half again, only if it still feels loose. Place it, smooth side up, into the bowl and cover tightly. NOTE: Best rising is around 75-80 degress F. When colder, you can rise dough in gas oven with pilot light, or in your microwave - place a 1 - 2 cups in a container (or micowave a couple of cups of water) to bring temperature up. This applies to the whole rising process.
- AFTER the fourth turn, at 80 minutes, leave the dough undisturbed for 1 1/2 to 2 hours or until well expanded and doubled.
- THOROUGHLY flour a baker's couche or two tea towels. Flour the top of the dough and the work surface, then turn the dough out. With a dough scraper, cut the dough in half. Gently stretch the pieces out (approximately 12 by 8 inches) and fold them loosely into thirds, like a business letter, arranging the folds so the last seam is slightly off center. Try to handle the dough as little as possible to avoid deflating it.
- PLACE the dough seam side down on the floured cloth and sprinkle more flour over the top. Cover the loaves with folds of the couche or more tea towels. Let them proof until they are very soft and well expanded and barely spring back when gently pressed, about 45 minutes. For higher loaves, use a baguette tray (a couple of large U shapes)
- IMMEDIATELY after shaping the dough, arrange a rack on the oven's second-to-top shelf and place a baking stone on it. Clear away all racks above the one being used. Heat the oven to 450 degrees.
- WHEN the dough is ready to bake, place a sheet of parchment paper on a peel. Gently flip the loaves onto it so they are seam side up and stretch them very slightly to make them vaguely rectangular. Don't be afraid to handle the dough; the breads will recover in the oven as long as you are gentle.
- DIMPLE the dough all over with your fingertips, pressing down to the paper without breaking through the dough. Slide the breads on the parchment paper onto the baking stone. Bake the breads until very dark brown all around, 32 to 36 minutes, rotating them halfway during baking. For a very crisp crust, turn off oven and let bread sit in oven for 10 or more minutes. Let cool on a rack before slicing. Bread is best eaten the same day.
Adapted from this great book:
Copyright © 2000,2012 e-rcps.com, All Rights Reserved